springboot安装SSL证书
版本:SpringBoot2.x
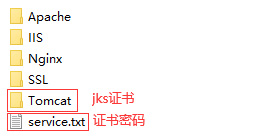
第一步:Gworg申请Tomcat类型证书,下载下来解压后会得到如下两个文件

二、SpringBoot 项目配置证书
我们需要一个正常的 SpringBoot 项目
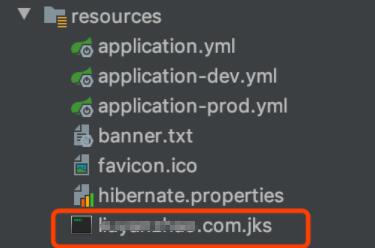
1、拷贝 Tomcat 里 baidu.com.jks 文件到 resourses 下面

2、在 application.yml 或者application.properties里添加配置
key-store 的值是上面那个 jks 文件的路径
key-store-password 的值是证书密码 service.txt 里的内容
# SSL证书相关配置
# https加密端口
server.port=443
# 证书路径
server.ssl.key-store=classpath:baidu.com.jks
# 证书秘钥
server.ssl.key-store-password=123456
# 证书类型
server.ssl.key-store-type=JKS
# 证书别名
server.ssl.key-alias=tomcat
3、启动类添加两段代码,用来设置内置 tomcat 的端口号和 https 配置
实现功能需要我们在springboot的application中配置如下代码
import org.apache.catalina.Context;
import org.apache.catalina.connector.Connector;
import org.apache.tomcat.util.descriptor.web.SecurityCollection;
import org.apache.tomcat.util.descriptor.web.SecurityConstraint;
import org.springframework.boot.SpringApplication;
import org.springframework.boot.autoconfigure.SpringBootApplication;
import org.springframework.boot.web.embedded.tomcat.TomcatServletWebServerFactory;
import org.springframework.context.annotation.Bean;


@SpringBootApplication

public class WebchatApplication  {

   public static void main(String[] args) {
      SpringApplication.run(WebchatApplication.class, args);
   }

   /**
    * http重定向到https
    * @return
    */
   @Bean
   public TomcatServletWebServerFactory servletContainer() {
      TomcatServletWebServerFactory tomcat = new TomcatServletWebServerFactory() {
         @Override
         protected void postProcessContext(Context context) {
            SecurityConstraint constraint = new SecurityConstraint();
            constraint.setUserConstraint("CONFIDENTIAL");
            SecurityCollection collection = new SecurityCollection();
            collection.addPattern("/*");
            constraint.addCollection(collection);
            context.addConstraint(constraint);
         }
      };
      tomcat.addAdditionalTomcatConnectors(httpConnector());
      return tomcat;
   }

   @Bean
   public Connector httpConnector() {
      Connector connector = new Connector("org.apache.coyote.http11.Http11NioProtocol");
      connector.setScheme("http");
      //Connector监听的http的端口号
      connector.setPort(8080);
      connector.setSecure(false);
      //监听到http的端口号后转向到的https的端口号
      connector.setRedirectPort(443);
      return connector;
   }
}
-------------相关专业安装教程分割线-----------------
配置application.properties:
#ssl
#https访问的端口
#server.port=8443
#证书,可以存放在resoucrs目录下classpath:tomcat.keystore
server.ssl.key-store=e:\gworg.com.jks
#证书密码
server.ssl.key-password=123456
#证书加密方式
server.ssl.key-store-type=JKS
server.ssl.key-alias=tomcat
application.yml:
server:
  #ssl
  ssl:
    key-alias:tomcat
    #证书密码
    key-password:123456
    #证书,可以存放在resoucrs目录下classpath:tomcat.keystore
    key-store:classpath:gworg.com.jks
    #证书加密方式
    key-store-type:JKS
  #https访问的端口
  port: 443
启动项目,输入 https://即可正常显示。
重点关键:重新编译jar文件,打包进spring。
SpringBoot 配置ssl证书打包后在本地运行报443端口冲突解决办法
将springboot版本降低到 2.1.8(建议修改springboot版本)
或者将Tomcat版本改换成9.0.27(可能会出现其他问题!)
- 上一篇: Tomcat9.0安装SSL证书
- 下一篇: CentOS系统Tomcat8.5或9部署SSL证书


